Monday, 19 January 2015

How to make your own custom sized dress form

I've tried several times to make myself a dress form in my measurements via the 'duct tape method' and found out the hard way that I am entirely too claustrophobic to have someone wrap me in duct tape. That didn't stop me from wanting a dress form in my size though. 
I happen to be lucky enough to have an amazing network of friends whom keep a watchful eye out for tools, opportunities and even dress forms that I can put to use- I don't know where I would be without these folks, other than working in a significantly less equipped sewing studio! One of these amazing people recently acquired me a store front mannequin and a sewing dress form, it just so happened that the sewing dress form had a waist the same as my tightlaced waist measurement and since it needed to be re covered anyway, I thought why not try and make myself that custome sized dress form I've been wanting?!
This is the shape she was in when I brought her home;
I set to work, first by removing her existing jersey covering, I used this later for a pattern for her new covering- it gavee the general shapes I needed, though I had to add a lot extra fabric to the bust and hip areas to accommodate my new padding. 
This is how she looked after removing her old cover; 
I filled in any dents, knicks and holes with filler, and measured her existing measures, compared to my own. 
I used an old bra to help get the breast shape I wanted, I padded this out with upholstery foam to ensure fullness; 
I quickly found that no matter how much I padded that, I couldn't get close enough to my existing measures to be satisfied. So I sacrificed a second old bra to the cause and padded that one out until I reached the measurement needed. I then glued this all in place with hot glue to prevent any shifting and/or gaping. 
For the next step I cut myself lengths of upholstery foam to pad out the hips, this took a significant amount of foam, over the course of several layers- my hips are nothing close to what this dress form originally had! 
I trimmed the foams edges as best I could to be smooth and flush rather than square as it typically is when cut. This process is time consuming and messy (little bits of foam get everywhere!). However, I wanted to make sure she didn't end up looking clumpy when completed. 
In the interest of further smoothing out the finished figure I also sacrificed an old tank top to the cause, and glued this in place;
I then cut and sewed a new covering fabric for her. When picking fabrics I picked an embossed jersey that is subtle but still gorgeous- I didn't want to go with anything too crazy, lest I get tired of it and find myself recovering again soon. 
This is the finished product, and while it's not perfectly my figure, it's the closest I've ever had and that's awesome to me!


As always, the contents of this blog, including photos are the sole property of dark knits boutique and may not be used, reproduced or copied without express written consent. 

Saturday, 10 January 2015

Project: portal long fall boots part 3

Last I left off, I'd finished the heel supports for the portal long fall boots. This time around I'm going over the upper portion of the boots. 
First step for this is paint. Again with the heat set fabric paints that I rant and rave about, and I do so for a reason: they are flexible when set. Flex is needed in shoes, specifically at points where the shoe bends with the foot, if it doesn't flex it will crack that just looks bad. 
First things first is base coats. I did many many base coats of the white, heat setting each coat. Once that was complete I penciled on the patterns and got them even on both boots. Then I went to town painting the black bits as needed with multiple coats- heat sets, rinse repeat yadda yadda. 
Next is to cut the upper boot parts. I chose worbla for this, which is amazing since I typically hate worbla. Burnt fingers, swearing, more burnt fingers. Not good. 
I used my previously made pattern made from painters tape and a leg cast and traced multiples onto the worbla. The reason for the multiples you ask? I want this piece to have some thickness to it, not only to match the game version as best I can, but also to give the heel supports some meat to anchor into. 
I then cut and heat these and formed them together until I got that thickness I was after.
 Once I got the right thickness I began more heating and working on shaping. During this stage I also heat set these to the boot. I'll glue once there cooled as a double measure simply because I want my props to handle my abuses that I throw at them! 
At this point I also built an anchoring spot into the back of the boot, inside and out. 
Once all of the worbla is cooled and the glue has cured, and I'm certain everything is in place as if like, I bolted the heel supports on there,  I glue the lock nuts as an extra measure. 
 At this point I was not convinced of the strength of the worbla alone, nor was I completely pleased with the smoothness. So I visited my good friend fibreglass resin, albeit a messy & pain in the ass friend, but this friend has saved my arse (and props) many times. While resin casting I also installed the elastic strips that hold in the leg in the upper part of the boot, these are sewn in and then resin goes overtop to smooth it.
After the resin cured I sanded. And sanded. And sanded some more. I feel like I spend as much time sanding as I do waiting in traffic- neither is pleasant, both are sadly required. Don't forget your respirator while resing casting and sanding, no one wants to breathe that junk in.  
Then comes more paint! Yahoo for that! I painted the uppers multiple coats is a plain ol acrylic white- NOT heat set. Heat set and finished worbla/resin combination product is bad news bears for everyone. Once that's complete and a few touch ups are done as needed I give everything an overnight to cure and dry, the next day I give it a good shot of clear coat, usually multiple coats. 
Often times after that first coat of paint you find all the spots that aren't quite smooth enough... As was the case here. Much to my chagrin, back to the sanding I went. This is the finished long fall boot that even Cave Johnson would approve of. 
I'll be posting a photo of the whole finished cosplay as soon as I get them from the photographer!

As always all information (including photos) contained in this post is intellectual property of DKB and may not be copied in any way without express written permission

Project: portal long fall boots part 2

In part 1 of the portal long fall boots tutorial I left off at the heel springs/supports. 
Since then I've acquired a six foot length of 1/8" thick, two inch wide spring steel. I checked my steel design books and that should more than adequately hold my weight- who knew I'd be using all those fancy engineering courses for cosplay?! The thickness and width of flatbar you use for this will vary based on your weight- you don't have to do the math on this if you don't want to, most metal manufacturers will have load ratings for thier product. 
I chopped it to length, I won't give a length here because that will vary based on how tall the person wearing the boots is, I figured this length out by using a strip of flexible plastic (aka my long French curve from drafting class. At this point I think my professors would do some hardcore cringing at my use and application of university learned stuffs.) 
Such beauty, much happy;
The next step, and this is an important one, is to gind and bevel the ends of the flatbar. This is important should the bolts holding your flatbar on your boot ever let go, there's nothing sharp and hopefully the only thing hurt is your pride. This is the point where I say I take zero responsibility for any long fall boot builds that may use this method, you build em, you take responsibility for em! 
For the next step I did some more maths and figured out the sheer resistance I'd need and the number of bolts to hold these bad boys on and keep them there despite all my ample-ness coming down on them with every step.  Those calculations showed me that I could get away with 4-5 3.5mm hardened steel bolts. (Again, if you aren't up for the math contact the manufacturer for thier specs- I just prefer my calculator to talking on the phone.)
I also bought lock nuts to go with said bolts to help keep everything together. I will glue the lock nuts in place on the bolt when I get to that stage, but a little exta reassurance never hurt. 
Read: I really don't want to fall in my arse because my shoe build boarded the fail boat!   
This is the bolt pattern I eventually ended up going with. In the event I decide I need the fifth bolt, I can add it to the middle, I just really didn't want to do more drilling. As luck would have it it is rather difficult to drill through this stuff, and I killed my drill in doing so. *moment of silence for the drill* 

The next step for the heel supports is to bend them. I'm sure that there is an easier way to do this than I did. I clamped the flat bars to my work bench, heated them with a torch till they were a little more mailable, but not red hot. And I hammered and heaved on them till I got the curve I liked. Like I said, there are easier ways, but one uses the tools available, no matter how much the insessant hammering drives the neighbours mad. 
Once I had a curve I liked on the first heel support and it fit up as intended, I traced it on my workbench so I could compare for the second curve. Then repeat the banging and heating much to the chagrin of the neighbours. 
Now we've got ourselves a pair of fancy heel spring supports for our long fall boots! This is where I end part two of this party. In part three I will cover my process for making the upper portion of the boot and affixing it all together, so stay tuned! 


As always any information here is intellectual property of DKB and may not be reproduced or copied In any part without express written permission. 


Wednesday, 7 January 2015

Project: portal long fall boots part 1


I've decided it's about time I make myself the Chell cosplay from the portal series I've been wanting since I first played the games- after all it will be nice to check a piece off my metal list of personal "must do's". That and my awesome family got me a portal gun for Christmas, woot! 

I started with a pair of boots that had the toe box shape I was looking for. I didn't care about much else since I'd be changing it anyway. 
I chopped of the heels and added some apoxie sculpt to hide my shoe butchery. (I wear a mask when I chop the heels off because dust and bits end up everywhere- safety first and all that. You can see the freshly cut boots on the table here:

For the next step I took a rough cast of my legs from ankle to knee using painters tape. I really suggest sacrificing a pair of knee high socks to the cosplay gods and taping to that rather than just bare skin, I thought because it was painters tape it would come off easy.... That shit still hurts! 

After wrapping my leg in painters tape I free handed the general shape I am looking for on the tape with a sharpie and labeled it. This goes on to make my pattern for later. 

From here I've been focused on getting the boots an even white, and still flexible enough that I can walk in. Regular paints will crack along flex points when you move & bend the foot. To remedy this I've painted them with a few coats of light body, heat set fabric paint. You can acquire this amazing stuff at most screen print and signage supply shops. 
After each coat I give it a good shot with the heat gun on high to set it all. 
I'm going to make this the end of my first  part of this build, simply because I need to go out into the great yonder and get myself some aluminum flat bar for the heel springs/supports. 
Part two to come in a few days! Thanks for reading!


As always, all patterns, photos and information contained in this post is the sole intellectual property of dark knits boutique and may not be copied, reproduced or altered in anyway without express, written consent. 


Wednesday, 4 December 2013

Sh*t my family says

As most of you know, I am pretty much incapable of taking myself seriously and I am the black sheep of the family... followed close behind by my mom, whom is equally as strange but it learning to embace her odditys. (I had nothing to do with that!)
Anyway... in conversations with my parents about my work, my creative endeavours and just general life; conversations tend to take a turn for the odd, often leaving me wondering "is this really happening?" So for your amusement I present you with sh*t my family says.

*Obligitory cover my ass note to any family whom may read this; Read at your own discretion. As with all things in my life, you don't have to be a part of it if you don't want to. I don't want to hear anything about it either! Freud would call it therapy- leave it at that.  End obligitory cover my ass note*
                                                                                                                                                 

I was telling my mom about my Alphonse Elric suit of armour/cosplay im working on;
Mom: "I don't know what that is send pics"

Me: "its a bit ambitious, but it'll be awesome. Plus, how many people can say they have a life sized suit of armour kicking round the house? I can put Leonard in it!" (Leonard is my house hold skeleton)

Mom:  "Is that a costume for the Ginger?" (The Ginger is my better half)
Me:  "No, its for me. He's likely going to have to steer me thru the crowds while I rock it"
Mom: "Awesome.... I just thought you'd do something sexier."
Me:"Nothing like sexual objectification from your parental unit first thing in the morning.... truth be told its kind of a pain in the ass dealing with creepers at conventions constantly, so when I don't feel like it I will have this! Oggle my ass now douchbags, oh right, you cant see it! hah!"
Mom: "how are you going to look so manly?"
Me: "football padding, I think. I'll cross that bridge when I get to it"


I recently did a fashion show for my new carnival collection at the Taboo sex show. My dad came. My dad has never come to any of my fashion shows before, he's essentially as redneck as they come, and he chose to attend this one of all of them.... my last one was at a classy dueling piano bar, but nooooo the sex show is the one Dad came out to. Awesomeness ensued, well likely awkwardness for him but eh.... I have no shame hence why I'm posting this stuff! (and i'm getting even for childhood embarassments...heh)

Me: "Dad! Thank you so much for coming!"
Dad: "No problem kiddo, was finally in town for one of these. There are some *clears throat as awesome pony play girl walks by* interesting folk here."
Me: "oh yeah! The show is hosted by an amazing drag queen, shes sweet as pie! And I have my first androgynous piece in this collection, im excited about that- it fits like a dream!"
Dad: "A drag queen? like a tranny? whats androgynous mean?"
Me: "oh dad, no not like a tranny, those are two different things, and tranny is an offensive term to some- you wouldnt call a black person the N word, its the same premise. I have to go back stage and wrangle all the models now."
Dad: "okay, have fun with your queens" 

After the show there were hugs and he pulled a dissapearing act that would make Houdini himself scrach his head in disbelief. I figure I will give him some time to digest all that was seen-that-cannot-be-unseen before chatting with him about it...  


I have been in the process of making myself a monster rug for my studio for years. (In my defense of the timeline-it took a long time to aquire the parts!) I finally finished it not long ago and I proudly showed the work in progess pictures and pictures of the final piece adorning its designated spot to the family at a family get together.

Mom: working on anything interesting lately?

Me: I finished my monster rug, which makes the ginger happy, since we can now get rid of that huge box of monster parts i've been lugging around for ages. (showed her a picture on my phone)


Mom: Show that to Grammie!
Grammie: wow... thats... uh... kind of ugly.
Me: Well thank you Grammie. I think its all kinds of awesome too. And as an added bonus I can throw it over my back and pester door to door sales people when they come by!


My brother Shawn has been dating a lovely girl whom hes picked up his latest fashion sense from. Im not generally opposed to wearing anything that makes you happy (or gets you laid) but I still have to get my digs in when I can, he IS my brother after all.

Shawn: Do you know of any close stores where I can go get a vest?
Me: ummm like a lumberjack vest? Or a suit jacket vest?
Shawn: a dress up kind of vest.
Me: I donno, try stores that sell fedoras, overly tight t-shirts and pants?
Shawn: Hah, thanks asshole.
Me: The fedora store called, they have a tighter pair of jeans!


I think thats enough familial embarrassment for now! Till next time folks!

Monday, 12 August 2013

Animethon 2013!

This past weekend Dark Knits had a booth at Animethon 20 in artists alley, organiser disorganization gongshows aside it was a good show for us, many positive interations with all sorts of folks, saw some absolutely incredible cosplays, and we nearly sold out! Thank you heaps much to everyone whom came out to visit us!
                                             Dark Knits Boutique booth at Animethon 20

Wednesday, 15 May 2013

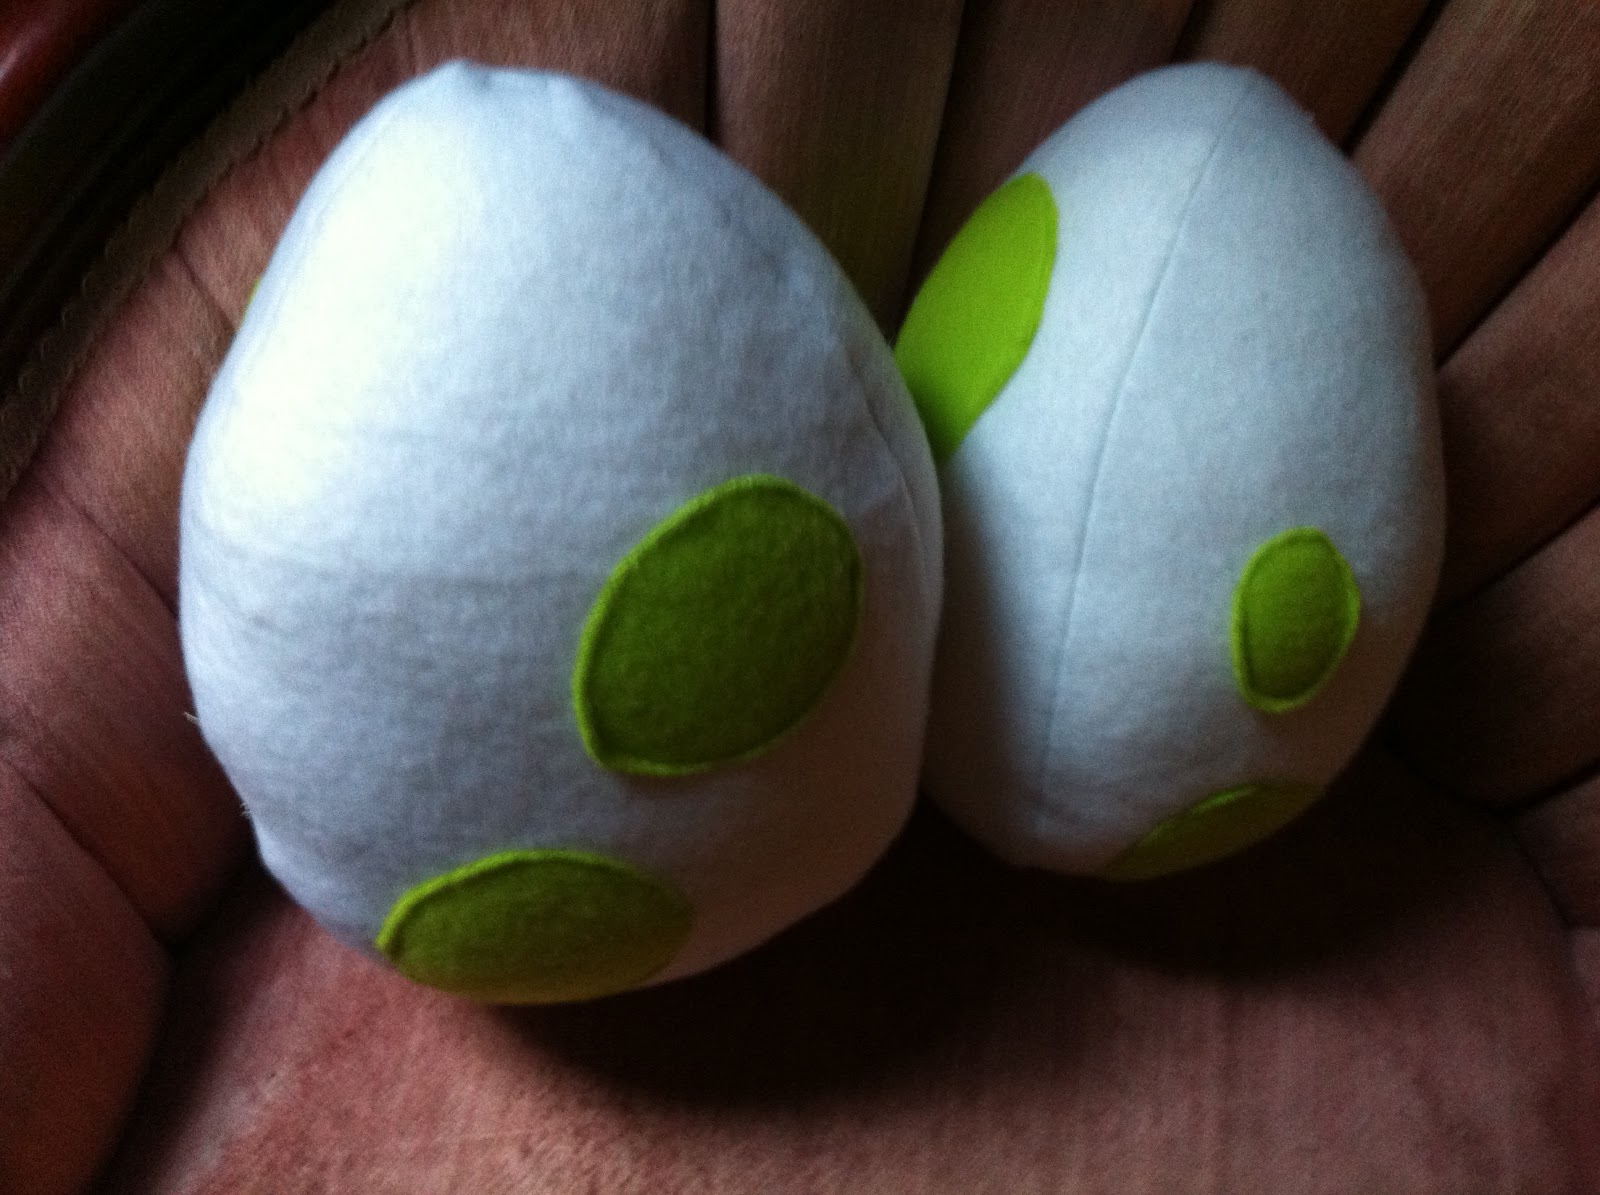
Yoshi egg stuffies!

If you are from my generation chances are Nintendo's Mario bros. series spent more time raising you than your parents did, honor those childhood memories and bring some of that pixelized geekyness to your abode by making yourself some Yoshi egg stuffies. These make great nerd gifts too- I've had threats of mass yoshi egg theft from undisclosed friends... you know who you are you douche canoes.

 *I just want to make it clear that these are something I pulled out my ass for a friend (and now I have a metric shit ton of them in my geek room), they are not lisenced or endorsed by Nintendo, they are just something neat that any mental giant with a sewing machine can put together*

Finished Yoshi egg stuffies


You will need: (makes two eggs- provided you dont screw up.):

~0.5m White fleece (splurge the extra fifty cents a yard for the non pilling kind... You will thank me later when your yoshi eggs are well loved and not looking like they have some undiagnosed STD)

~0.1m Green fleece (or colour of your choice) Buy more coloured fleece if you want your eggs to have more spots, and again- don't be a cheap bastard, get the non-pilling fleece.

~A sewing machine (or a needle and thread and lots of extra time on your hands.)

~Scisors

~Stuffing of some kind- you can use all sorts of stuff for this, from scrap fabric bits to actual stuffing from the craft store... in my experience you have to stuff these suckers quite dense to hold the shape well- so your really better off buying a bag of stuffing.

I buy stuffing in bulk. Seems like I always need that junk.


How to:
Step 1:
Cut your fleece. You will have to cut oblong circles of varying sizes our of the coloured fleece.

As a side note, I havent been able to find out if Yoshi eggs have a specific number, size or placement pattern for the spots. Knowing the nit-picky folks at Nintendo, I would think that they do, but I havent found it.... If you manage to find it help a sister out and let me know.

You'll also have to cut out 3 'football' shaped panels out of the white fabric. (see the picture below) Make them slightly more pointed on the top and more roundy on the bottom to give an egg shape when complete.


Step 2:
Fire up ye-olde-sewing machine! Start by sewing the coloured spots flat onto the white football shaped panels, to keep everything looking good, keep the stitches a uniform distance away from the edge of the coloured fleece. (a couple milimeters is plenty to give it enough strength to hold the fabric down)

Step 3:
Now that you have your coloured spots attached to the white panels, its time to stitch the white panels together. I shouldnt have to say this, but put them face to face (side with coloured spots to side with coloured spots) and sew ONE of the outside edges.... not two boys and girls, unless you want the flattest yoshi eggs you've ever seen.

Step 4:
Take that third panel and do the same thing, sewing both sides, but make sure to leave yourself enough room to turn it right side out and stuff it.

Step 5:
Turn it right side out and stuff it. Shocking stuff, I know.

Step 6:
Hand stitch the hole you used to stuff it shut. Hand stitching is the devil and most people suck at it, sorry 'bout that there sunshine. Practice makes perfect!

 
Yay finished yoshi eggs! Protect them from your klepto friends... seriously.


As always, the content displayed in this post (including the pictures!) is property of Dark Knits Boutique and may not be copied in any form without express written consent.